
SharePoint Online’s modern communication site offers a user-friendly and responsive interface with a number of features that were previously unavailable in classic publishing sites.
We’ve seen many clients wanting to upgrade their existing publishing sites to modern without a large migration effort. While this method may not be best practice compared to migrating, it does provide the process to upgrade and enable the most desirable features of the modern Communications site.
This guide will walk you through the steps to upgrade your classic publishing site to a modern communication site.
Step 1: Run the script that adds all the features needed to be a Comms site
Before you can start the upgrade process, you’ll need to run a script that adds all the features required to turn your classic publishing site into a modern communication site.
Install-Module SharePointPnPPowerShellOnline
Connect-PnPOnline –Url https://[tenant-name].sharepoint.com/sites/[site-name] –UseWebLogin
Enable-PnPCommSite
Step 2: Deactivate all the Publishing features on the site AND the site collection
Once you’ve run the script, you need to deactivate all the publishing features on your site and site collection. This includes deactivating the “Publishing Infrastructure” feature, which is required for classic publishing sites. You can do this by going to the Site Settings and selecting “Manage site features” and “Manage site collection features” to deactivate these features.


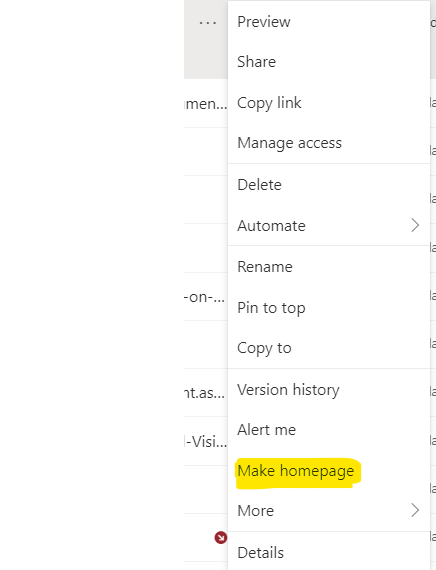
Step 3: Create a new site page to make it the homepage
After you’ve deactivated the publishing features, you need to create a new site page and make it the homepage. This is because modern communication sites don’t have a separate “homepage” like classic publishing sites do. You can create a new page by going to “Site Contents” and selecting “Site Pages”, then click on “New”. Once you’ve created your new page, set it as the homepage by going to “Site Settings” and selecting “Site Information”. Then, click on “Edit” and select your new page as the homepage.
Step 4: Turn off the navigation and set it to structured instead of managed
The next step is to turn off the navigation and set it to structured instead of managed. This is because modern communication sites have a different navigation system than classic publishing sites. To do this, go to “Site Settings” and select “Navigation”. Then, turn off the “Managed Navigation” feature and select “Structural Navigation”. This will give you more control over the navigation structure of your site.
Step 5:Update the navigation by clicking Edit at the top of the page
Finally, you need to update the navigation by clicking “Edit” at the top of the page. This will allow you to add links to your site’s pages and other content. You can also create drop-down menus and submenus to organize your content in a logical way.

Step 6 (BONUS): Run PS Script to enable Mega-cascading tabs in navigation bar
If you want to enable a mega cascading top navigation bar menu in your modern communication site, follow these steps:
- Run the PS Script below to enable megacascading menu for the top navigation bar.
- Click on “Add link” at the top to add a new link to the megacascading top navigation menu.
- Enter the link’s name and URL in the “Add Link” window.
- Click on “OK” to save the link.
- Repeat steps 2-4 to add additional links to the megacascading top navigation menu.
- Once you’ve added all the links you want, click on “Save” to save the changes to the navigation.
#Parameters
$SiteURL = "https://[tenant-name].sharepoint.com/sites/[site-name]"
#Connect to PnP Online
Connect-PnPOnline -Url $SiteURL -Interactive
#Enable Mega menu
$Web = Get-PnPWeb
$Web.MegaMenuEnabled = $True
$Web.Update()
Invoke-PnPQuery
#Variables
$SiteURL="wo[tenant-name].sharepoint.com/sites/[site-name]"
Try {
#Connect to the Sub-Site
Connect-PnPOnline -Url $SiteURL -Interactive
#Get the subsite
$Web = Get-PnPWeb
#change the quick launch oritentation
$Web.HorizontalQuickLaunch = $true
$Web.Update()
Invoke-PnPQuery
Write-host "Navigation settings Updated!" -ForegroundColor Green
}
Catch {
write-host -f Red "Error Setting Navigation!" $_.Exception.Message
}
With the megacascading top navigation menu enabled, you can now create a top-level navigation structure that includes multiple levels of submenus. This will allow you to organize your site’s content in a more intuitive and user-friendly way, making it easier for visitors to find what they’re looking for.
Congratulations! You’ve successfully upgraded your classic publishing site to a modern communication site. With the new features and improved user interface, you’ll be able to create and manage content more efficiently than ever before. Remember to keep exploring SharePoint Online’s features and keep your site up-to-date with the latest best practices.